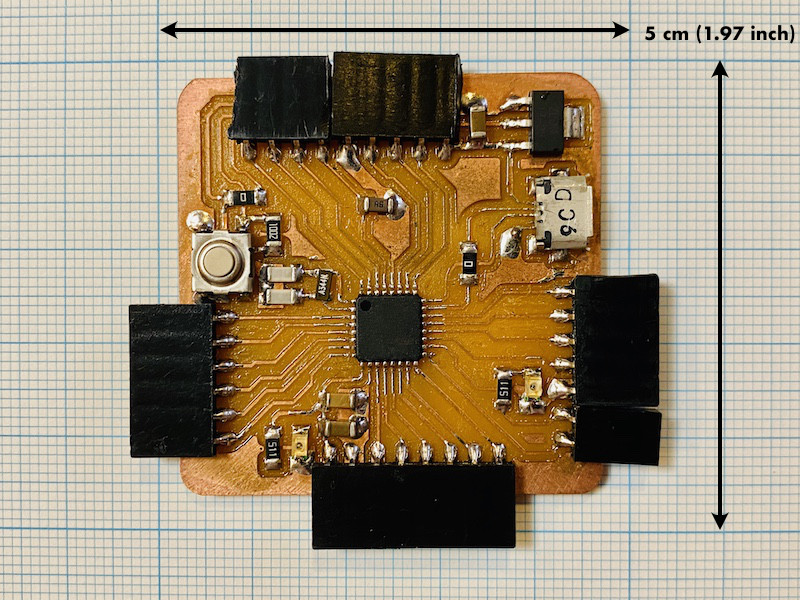
SAMDuino#
Author : Jun Kawahara (Fablab Kamakura)
Date created : 7/14/2020
SAMDuino is an ATSAMD21E breakout board, compatible with Arduino Zero. The board is powered by Microchip’s SAMD21E microcontroller, a 32-bit ARM Cortex® M0+ core. It runs at 3.3 V.
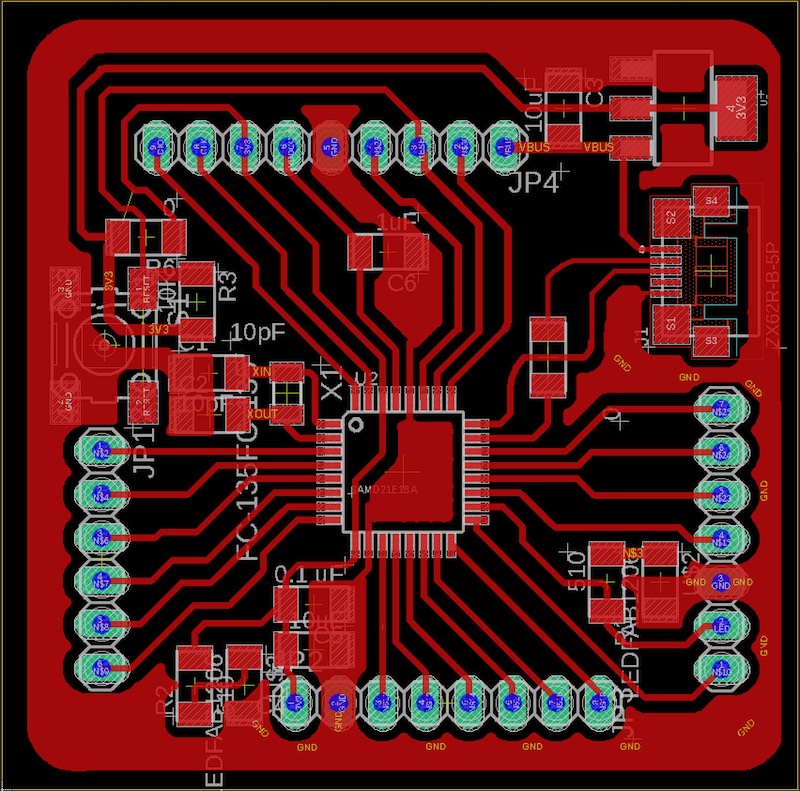
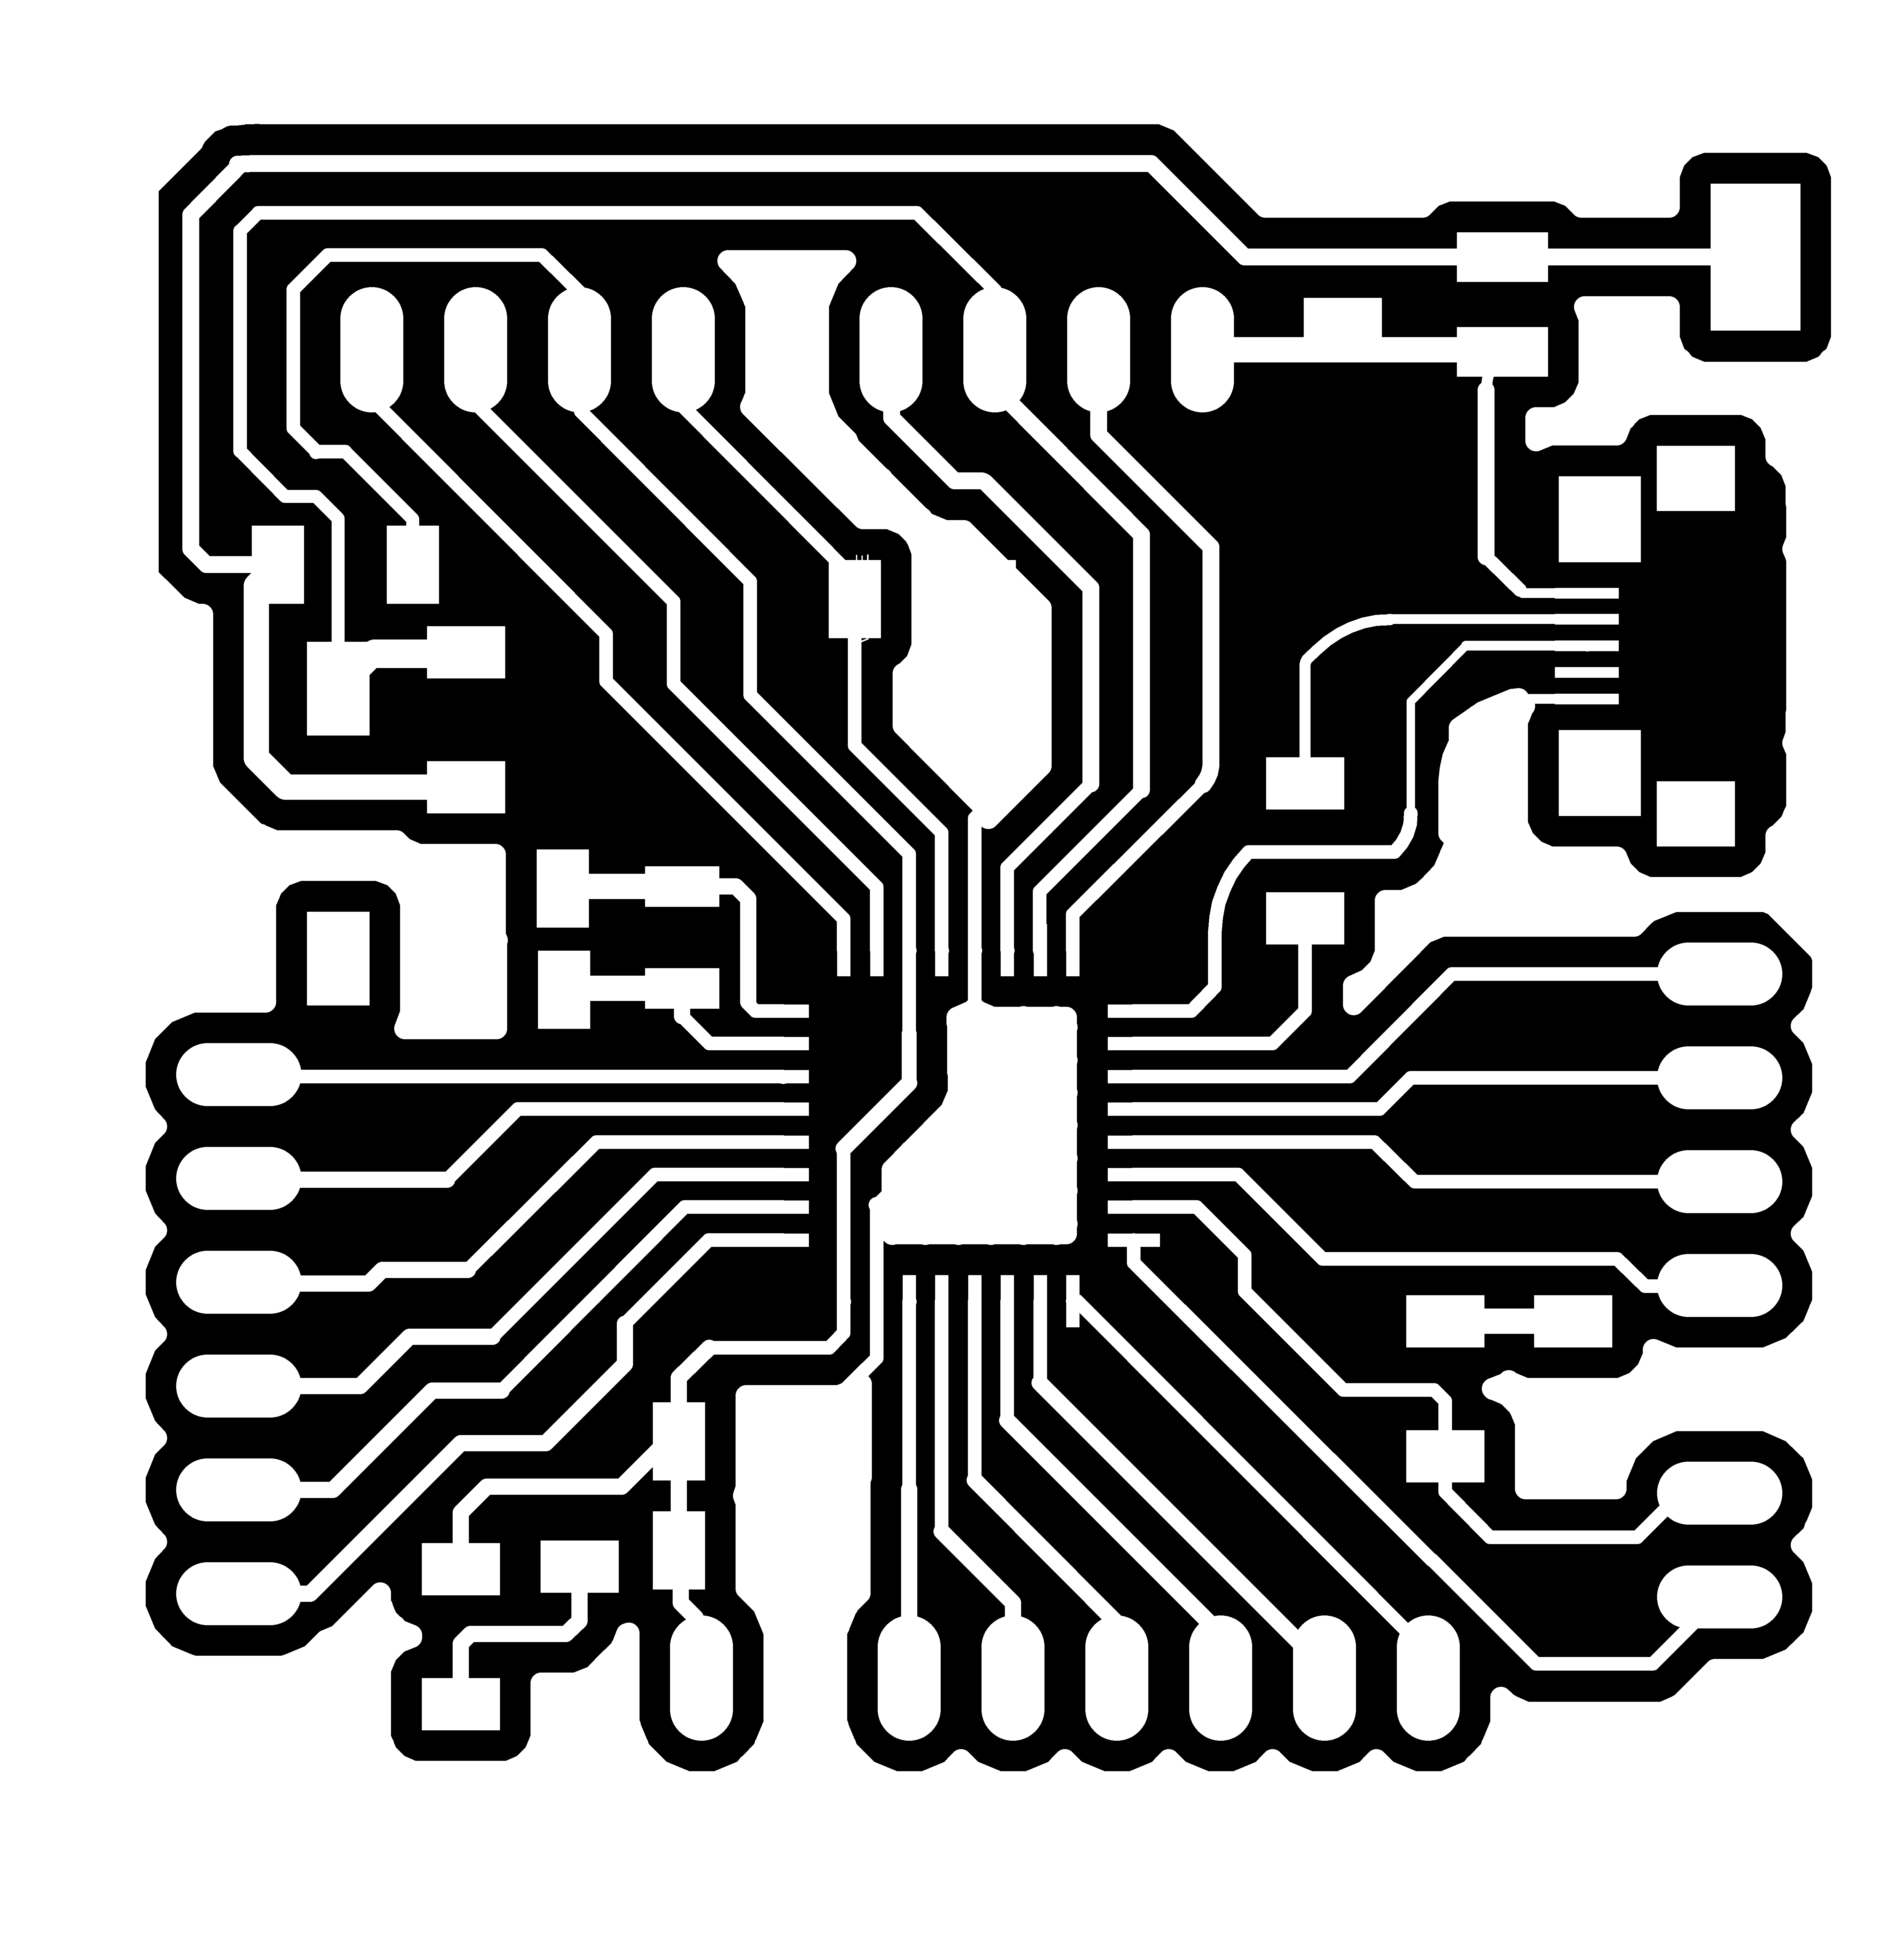
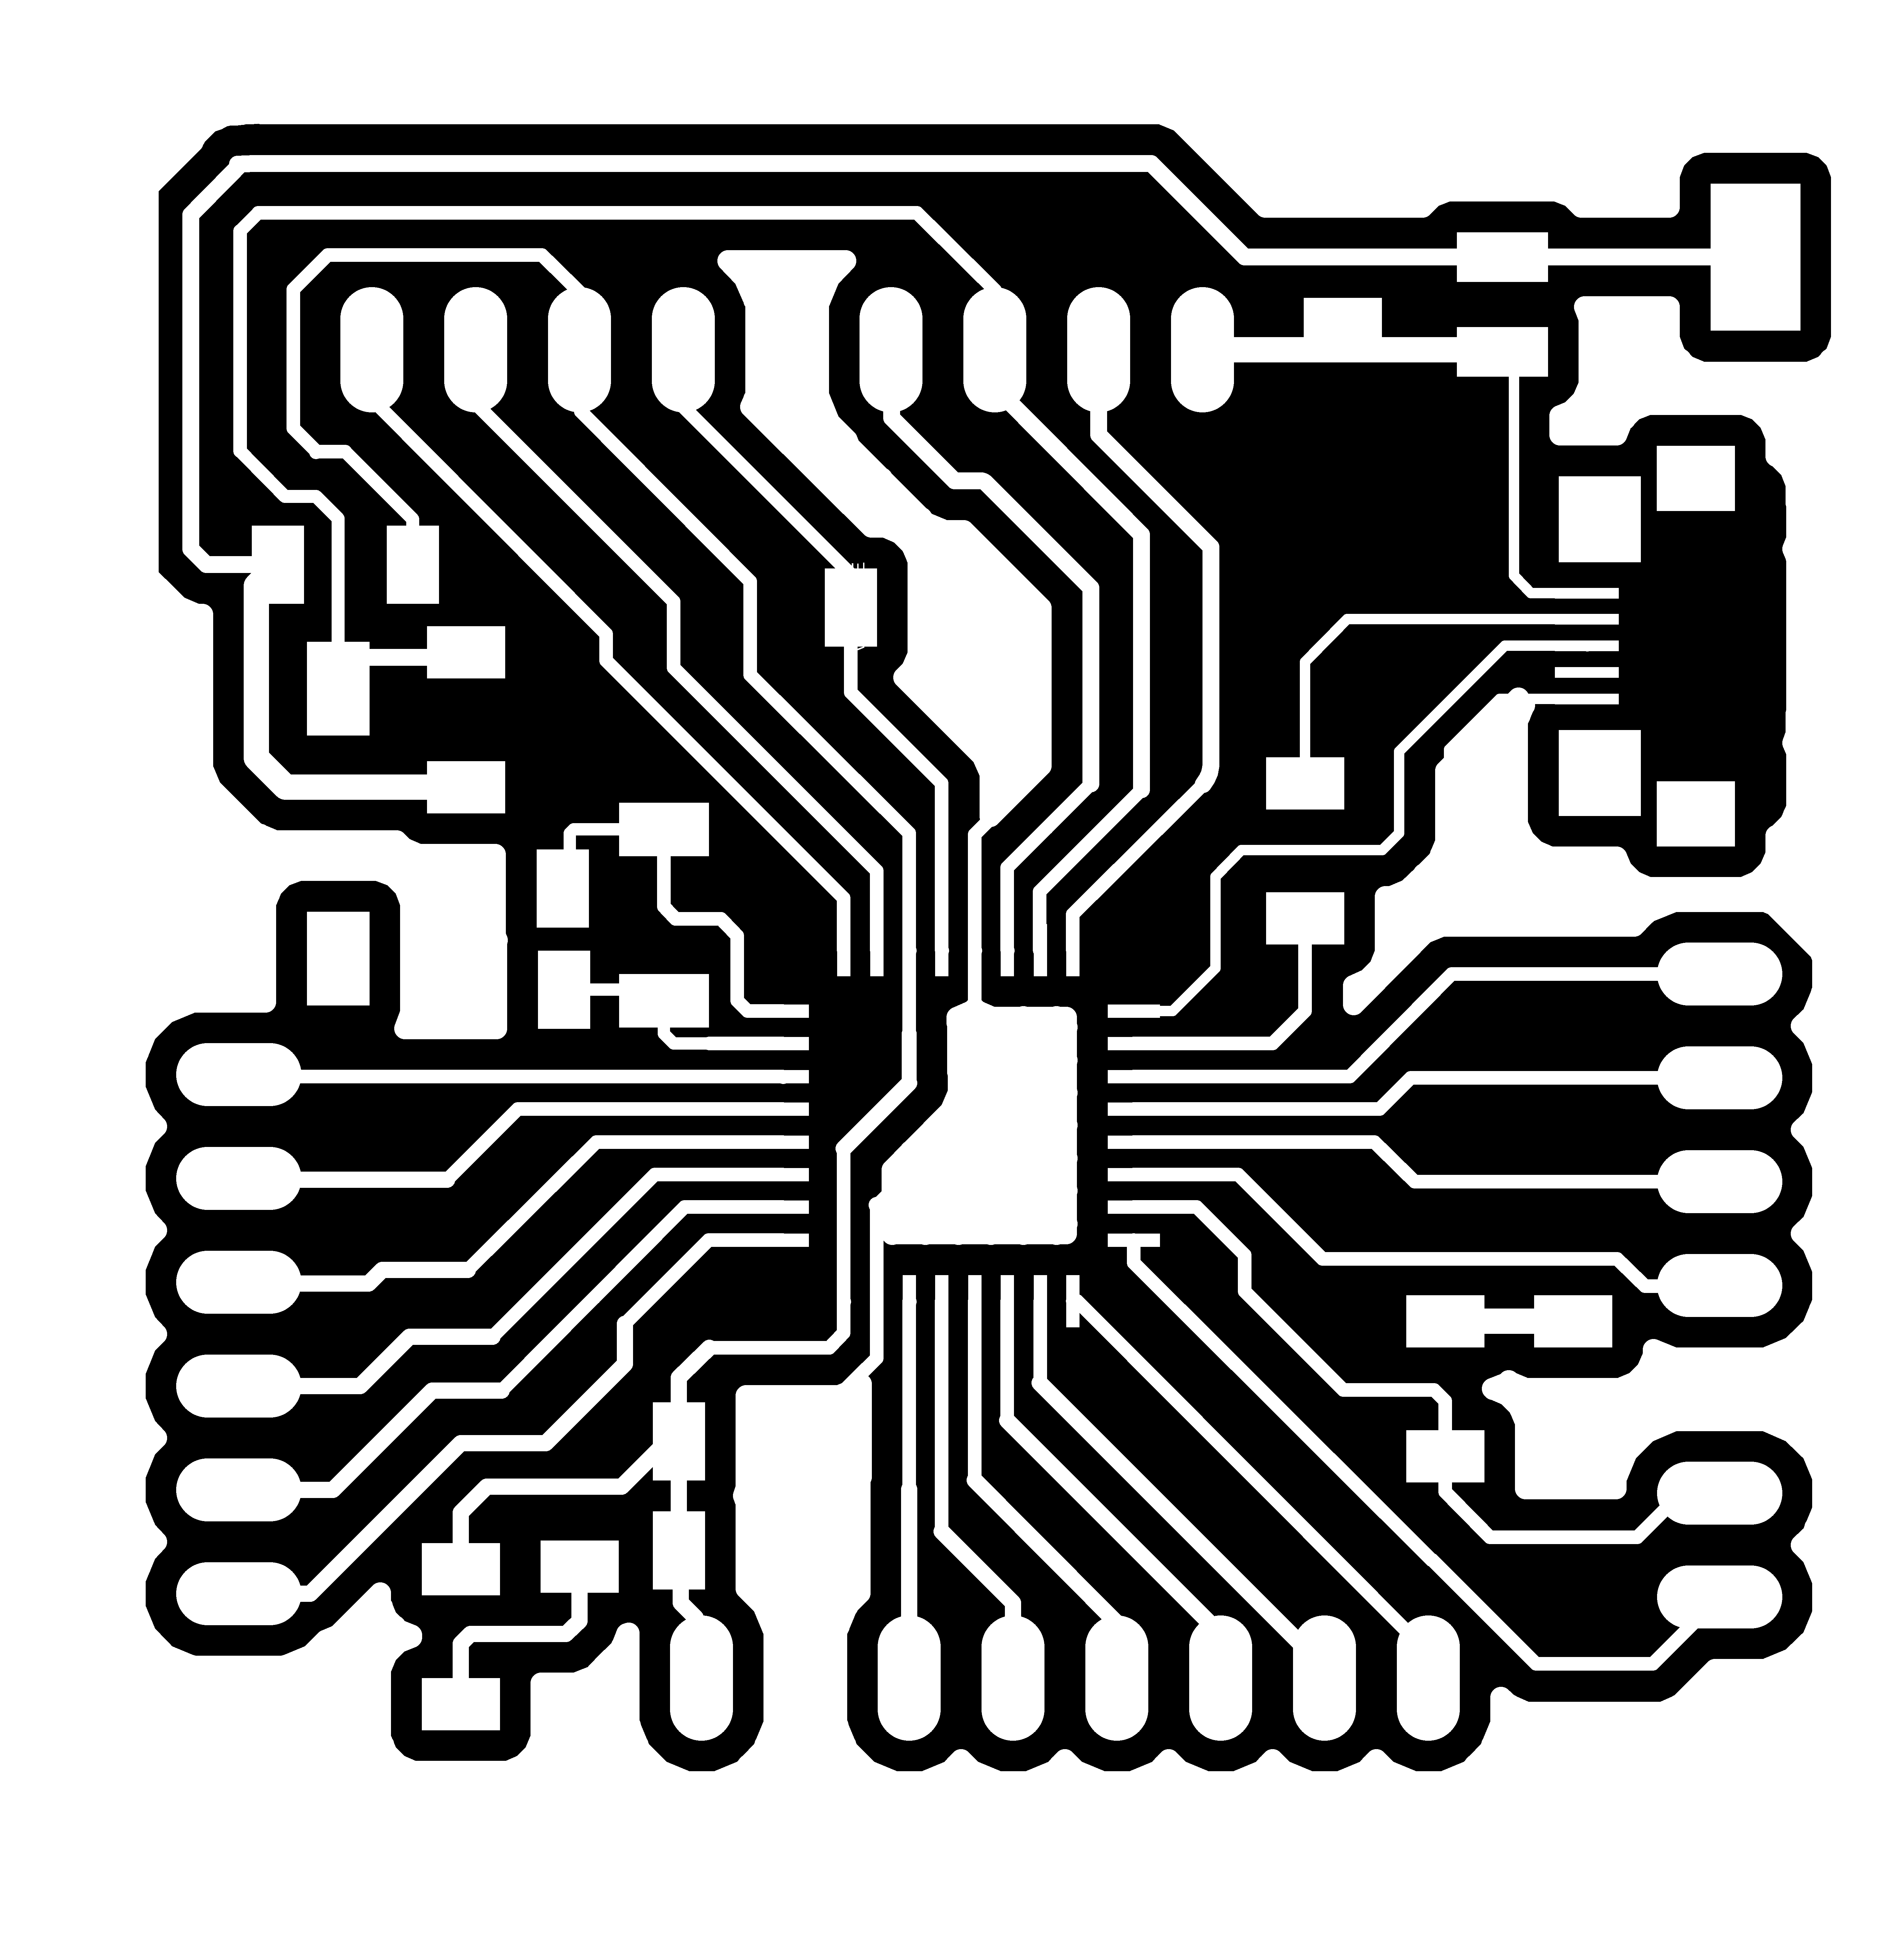
images for milling with SRM-20#
- image resolution: 1600 dpi(Enter 3200 dpi in mods settings because of mac-mods problem, e)
trace (crystal FC-135 version)
trace (crystal FC-255 version)
drill
cutout

BOM#
| Qty Value | Device | Package | Parts | Description |
|---|---|---|---|---|
| 1 | 6MM_SWITCH | S1 | OMRON SWITCH | |
| 1 | PINHD-1X6 | 1X06 | JP1 | PIN HEADER |
| 1 | PINHD-1X7 | 1X07 | JP3 | PIN HEADER |
| 1 | PINHD-1X8 | 1X08 | JP2 | PIN HEADER |
| 1 | PINHD-1X9 | 1X09 | JP4 | PIN HEADER |
| 1 | LM1117 | SOT223 | U1 | Voltage Regulator |
| 2 | 0 | RES-US1206FAB | R1206FAB | R4, R6 |
| 1 | 0.1 uF | CAP-UNPOLARIZEDFAB | C1206FAB | C5 |
| 1 | 10K | RES-US1206FAB | R1206FAB | R3 |
| 2 | 10pF | CAP-UNPOLARIZEDFAB | C1206FAB | C1, C2 |
| 2 | 10uF | CAP-UNPOLARIZEDFAB | C1206FAB | C3, C4 |
| 1 | 1uF | CAP-UNPOLARIZEDFAB | C1206FAB | C6 |
| 2 | 510 | RES-US1206FAB | R1206FAB | R1, R2 |
| 1 | FC-135 | FC-135 | X1 | Epson’s FC-135 Thin SMD High-Frequency Crystal unit |
| 2 | LEDFAB1206 | LEDFAB1206 | LED1206FAB | U2, U3 LED |
| 1 | SAMD21E18A | SAMD21EXXX-A | TQFP32-08 | U2 |
| 1 | ZX62R-B-5P | ZX62R-B-5P | HRS_ZX62R-B-5P J1 | Conn Micro USB 2.0 Type B |
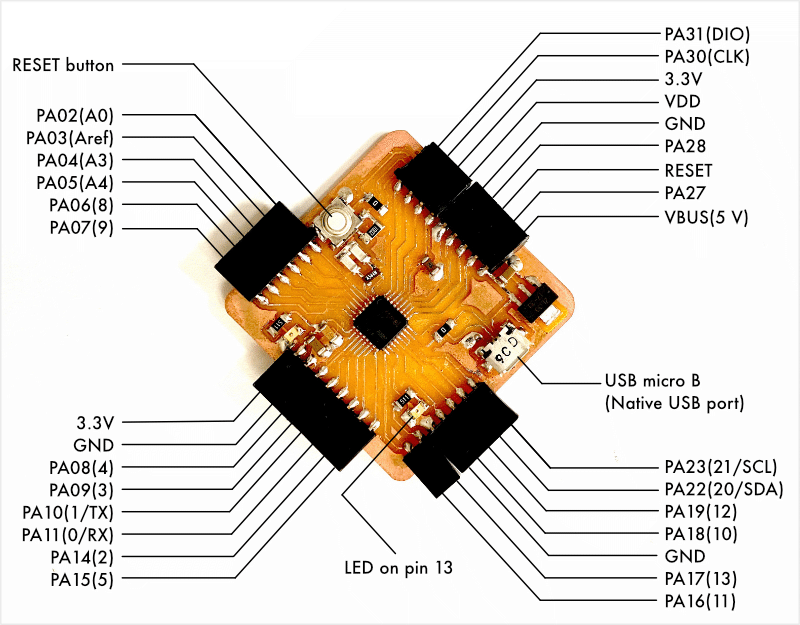
pin mapping#
Pin mapping depends on which bootlaoder you’ll burn onto SAMDuino.
Arduino Zero#
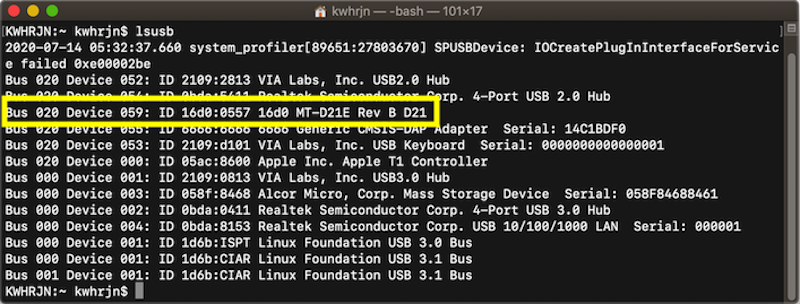
MattairTech MT-D21E(rev B)#
(WIP)
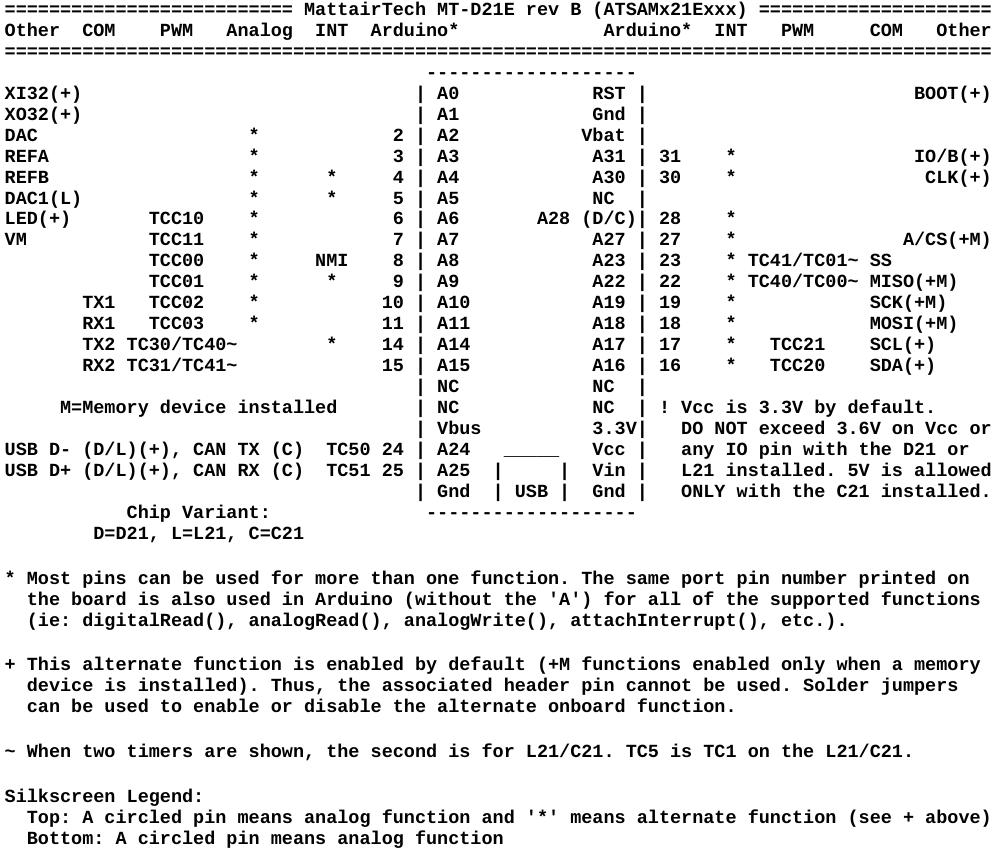 image source
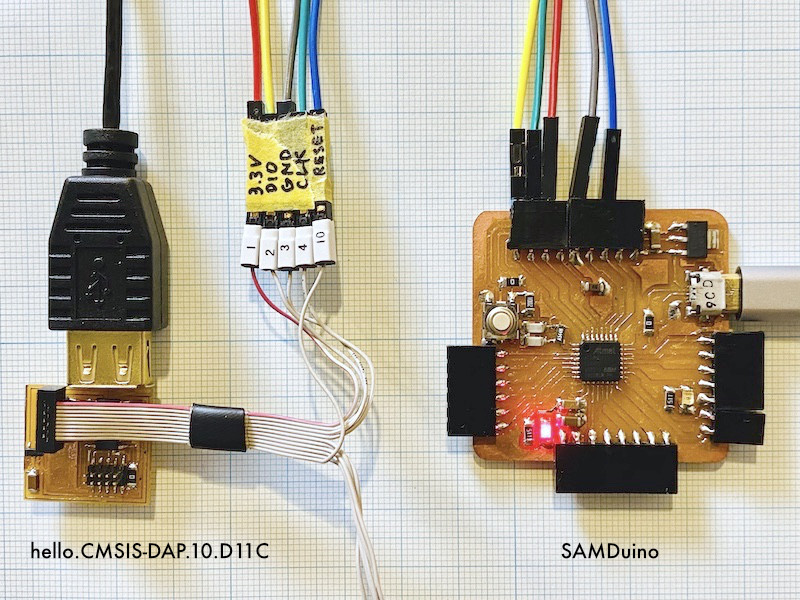
burning a bootloader#
requirements#
- SAMDuino (a target board)
- programmer: CMSIS-DAP compliant adaptor(a programmer; hello.CMSIS-DAP.10.D11C)
- 50-mil(1.27 mm) 10-pin mini squid cable with 10 x 100-mil(2.54 mm) sockets
- Arduino IDE
Arduino Zero version#
-
Connect your host PC and programmer. Make sure that your host PC can recognize your programmer as a USB device.
-
In Arduino IDE, go to Tools > Board and select “Arduino Zero (Programming Port),” also Tools > Programmer and select “Atmel-ICE.”
Now Burn Bootloader!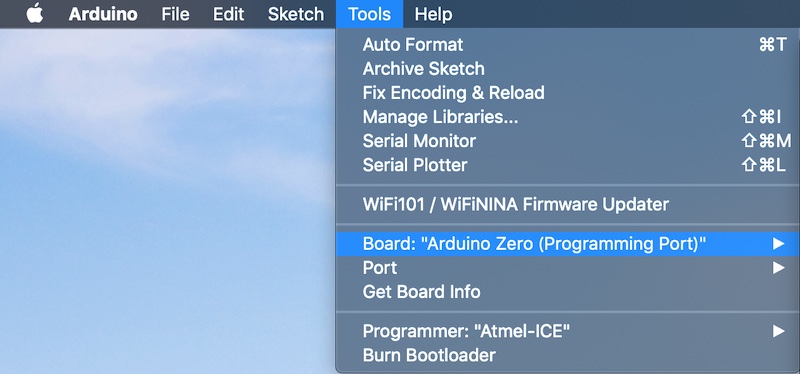
-
After verbose messages, Arduino IDE will be able to detect SAMDuino as an “Arduino Zero(Native USB Port)“
When you upload a sketch through USB, you have to select a board “Arduino Zero (Native USB Port)”
MattaireTech MT-D21E version#
-
Install board package for ATSAMD21, if neccessary. Open Arduino > preferences… Add following URL to Additional Boards Manager URLs section.
http://www.mattairtech.com/software/arduino/package_MattairTech_index.json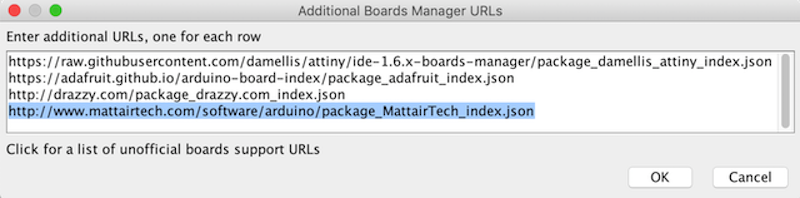
-
Go Tools > Board > Board Mangers…, search
mattairand install MattairTech SAM D|L|C core for Arduino.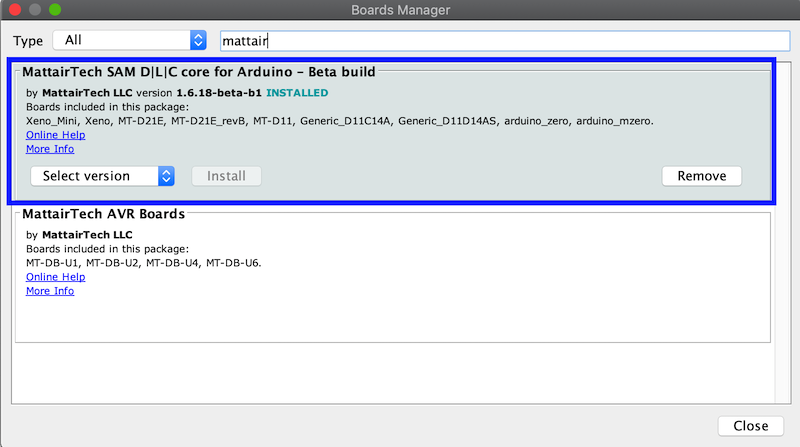
-
In Arduino IDE, go to Tools > Board and select “MattairTech MT-D21E (rev B)“
Microcontrller and Clock Srouce depend on your board design. Here I used SAMD21E18A and “32KHZ_CRYSTAL.”
Then, Tools > Programmer and select “Atmel-ICE.”
Now Burn Bootloader!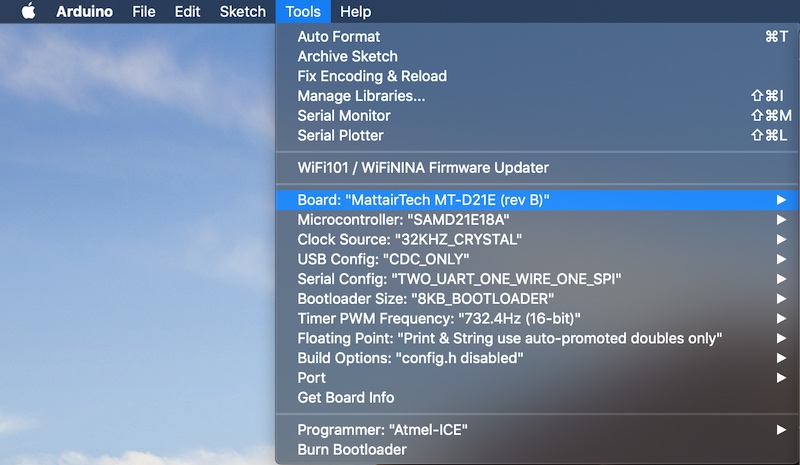 4. After a long verbose messages, “MattairTech Xeno Mini” will show up on your port.
 It’s not “MT-D21E,” but your host PC is able to recognize your board as a USB device, named “MT-D21E.”
examples - Arduino Zero#
Blink#
In Arduino IDE, Open File > Examples > 01.Basics > Blink, and upload. A built-in LED at pin 13 will blink.
hello echo (serial communication)#
Arduino Zero has at least two serial ports, SerialUSB for Native USB port (USB CDC) and Serial1 for 0(RX)/1(TX). Usual Serial which we use with Arduino Uno doesn’t work here unless if you define so.
serialUSB for Native USB port#
As you can see in Neil’s example code below, hello.D21E.echo.ino, in embdded programming week, he uses SerialUSB, not a familiar Serial.
//
// hello.D21E.echo.ino
//
// ATSAMD21E USB echo hello-world
//
// Neil Gershenfeld 12/24/19
//
// This work may be reproduced, modified, distributed,
// performed, and displayed for any purpose, but must
// acknowledge this project. Copyright is retained and
// must be preserved. The work is provided as is; no
// warranty is provided, and users accept all liability.
//

void setup() {
   SerialUSB.begin(0);
   }

#define max_buffer 25

void loop() {
   static char chr;
   static char buffer[max_buffer] = {0};
   static int index;
   if (SerialUSB.available()) {
      chr = SerialUSB.read();
      SerialUSB.print("hello.D21E.echo: you typed \"");
      buffer[index++] = chr;
      if (index == (max_buffer-1))
         index = 0;
      SerialUSB.print(buffer);
      SerialUSB.println("\"");
      }
   }
Serial1 for 0(RX)/1(TX)#
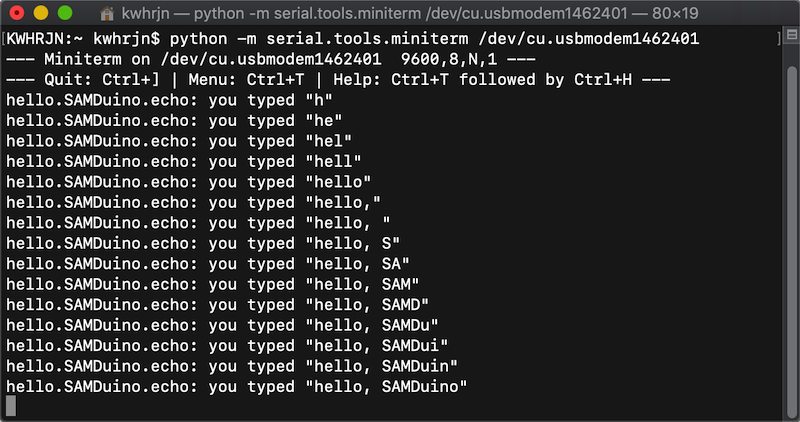
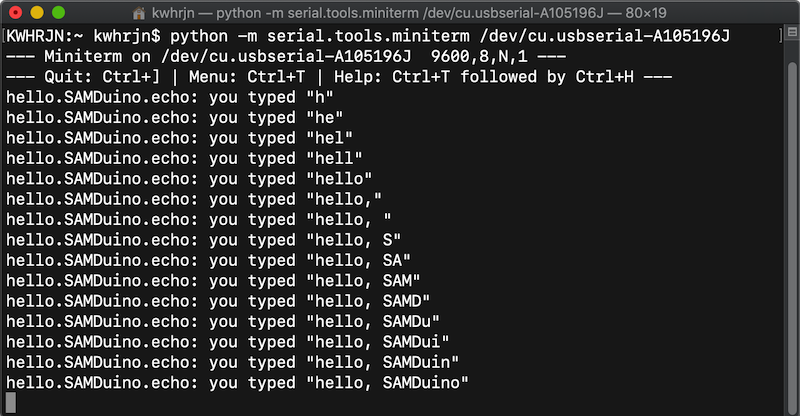
- Open hello.D21E.echo.ino with Arduino IDE.
-
In the sketch, replace SerialUSB with Serial1. Set a baudrate because “0” doesn’t work.
- SerialUSB.begin(0) -> Serial1.begin(9600)
3. Connect a UART-USB converter and SAMDuino with jumper wires.// // hello.D21E.echo.ino // // ATSAMD21E USB echo hello-world // // Neil Gershenfeld 12/24/19 // // This work may be reproduced, modified, distributed, // performed, and displayed for any purpose, but must // acknowledge this project. Copyright is retained and // must be preserved. The work is provided as is; no // warranty is provided, and users accept all liability. // void setup() { Serial1.begin(9600); //set baudrate } #define max_buffer 25 void loop() { static char chr; static char buffer[max_buffer] = {0}; static int index; if (Serial1.available()) { // SerialUSB -> Serial1 chr = Serial1.read(); Serial1.print("hello.SAMDuino.echo: you typed \""); buffer[index++] = chr; if (index == (max_buffer-1)) index = 0; Serial1.print(buffer); Serial1.println("\""); } }
- UART-USB converter TX <-> SAMDuino RX(0) - UART-USB converter RX <-> SAMDuino TX(1)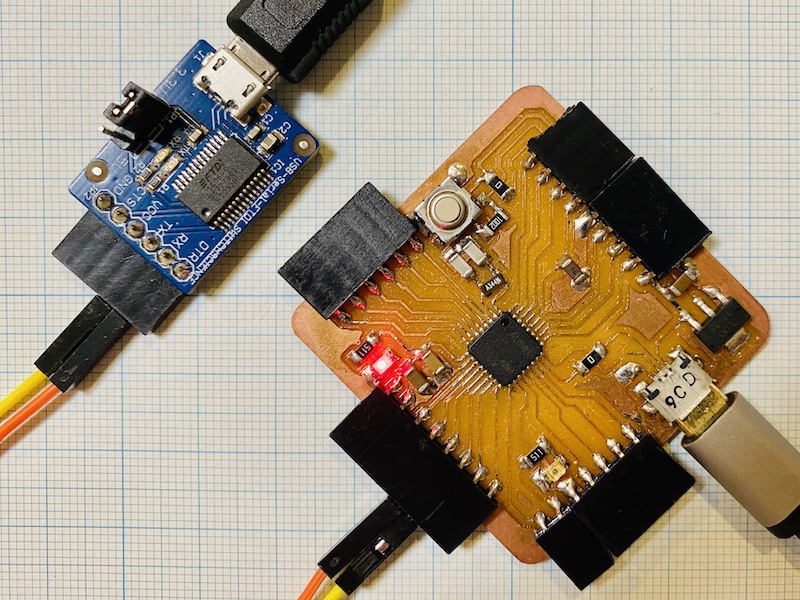
-
Open a terminal and type a command like below. Serial port device depends on your UART-USB converter.
python -m serial.tools.miniterm /dev/cu.usbserial-A105196J - Type a byte character. If SAMDuino echoed back the character, the serial communication through Native USB port worked.
Servo#
- In Arduino IDE, Open File > Examples > Servo > Sweep.
-
Wire between SAMDuino and a servo as follows.
- servo 5 V -> SAMDuino VBUS
- servo GND -> SAMDuino GND
- serov signal -> SAMDuino pin 9
-
Upload the sketch. You’ll see the servo rotate like in the video below.
NeoPixel#
Adafruit NeoPixel Library supports ATSAMD21 (Arduino Zero/M0 and other SAMD21 boards) @ 48 MHz. I also confirmed that FastLED worked with SAMD21.
Here’s an example, NeoPixel-Knightrider which uses Adafruit Neopixel Library.
// 888b    888                   8888888b.  d8b                   888
// 8888b   888                   888   Y88b Y8P                   888
// 88888b  888                   888    888                       888
// 888Y88b 888  .d88b.   .d88b.  888   d88P 888 888  888  .d88b.  888
// 888 Y88b888 d8P  Y8b d88""88b 8888888P"  888 `Y8bd8P' d8P  Y8b 888
// 888  Y88888 88888888 888  888 888        888   X88K   88888888 888
// 888   Y8888 Y8b.     Y88..88P 888        888 .d8""8b. Y8b.     888
// 888    Y888  "Y8888   "Y88P"  888        888 888  888  "Y8888  888
//
// NeoPixel-KnightRider
//
// A highly configurable Knight Rider (larson display) routine for your NeoPixels
// (WS2812 RGB LED)
//-----------------------------------------------------------------------------
// The MIT License (MIT)
//
// Copyright (c) 2013 Technobly - technobly@gmail.com - August 13th 2013
//
// Permission is hereby granted, free of charge, to any person obtaining a copy of
// this software and associated documentation files (the "Software"), to deal in
// the Software without restriction, including without limitation the rights to
// use, copy, modify, merge, publish, distribute, sublicense, and/or sell copies of
// the Software, and to permit persons to whom the Software is furnished to do so,
// subject to the following conditions:
//
// The above copyright notice and this permission notice shall be included in all
// copies or substantial portions of the Software.
//
// THE SOFTWARE IS PROVIDED "AS IS", WITHOUT WARRANTY OF ANY KIND, EXPRESS OR
// IMPLIED, INCLUDING BUT NOT LIMITED TO THE WARRANTIES OF MERCHANTABILITY, FITNESS
// FOR A PARTICULAR PURPOSE AND NONINFRINGEMENT. IN NO EVENT SHALL THE AUTHORS OR
// COPYRIGHT HOLDERS BE LIABLE FOR ANY CLAIM, DAMAGES OR OTHER LIABILITY, WHETHER
// IN AN ACTION OF CONTRACT, TORT OR OTHERWISE, ARISING FROM, OUT OF OR IN
// CONNECTION WITH THE SOFTWARE OR THE USE OR OTHER DEALINGS IN THE SOFTWARE.
//
//-----------------------------------------------------------------------------
// ASCII GEN http://patorjk.com/software/taag/#p=display&f=Colossal&t=NeoPixel
//
//-----------------------------------------------------------------------------

#include <Adafruit_NeoPixel.h>

// SETUP YOUR OUTPUT PIN AND NUMBER OF PIXELS
#define PIN 5
#define NUM_PIXELS  24

Adafruit_NeoPixel strip = Adafruit_NeoPixel(NUM_PIXELS, PIN, NEO_GRB + NEO_KHZ800);

void setup() {
  strip.begin();
  clearStrip(); // Initialize all pixels to 'off'
  strip.setBrightness(20);
}

void loop() {
  knightRider(3, 35, 4, 0xFF0000); // Cycles, Speed, Width, RGB Color (red)
}

// Cycles - one cycle is scanning through all pixels left then right (or right then left)
// Speed - how fast one cycle is (32 with 16 pixels is default KnightRider speed)
// Width - how wide the trail effect is on the fading out LEDs.  The original display used
//         light bulbs, so they have a persistance when turning off.  This creates a trail.
//         Effective range is 2 - 8, 4 is default for 16 pixels.  Play with this.
// Color - 32-bit packed RGB color value.  All pixels will be this color.
// knightRider(cycles, speed, width, color);
void knightRider(uint16_t cycles, uint16_t speed, uint8_t width, uint32_t color) {
  uint32_t old_val[NUM_PIXELS]; // up to 256 lights!
  // Larson time baby!
  for(int i = 0; i < cycles; i++){
    for (int count = 1; count<NUM_PIXELS; count++) {
      strip.setPixelColor(count, color);
      old_val[count] = color;
      for(int x = count; x>0; x--) {
        old_val[x-1] = dimColor(old_val[x-1], width);
        strip.setPixelColor(x-1, old_val[x-1]);
      }
      strip.show();
      delay(speed);
    }
    for (int count = NUM_PIXELS-1; count>=0; count--) {
      strip.setPixelColor(count, color);
      old_val[count] = color;
      for(int x = count; x<=NUM_PIXELS ;x++) {
        old_val[x-1] = dimColor(old_val[x-1], width);
        strip.setPixelColor(x+1, old_val[x+1]);
      }
      strip.show();
      delay(speed);
    }
  }
}

void clearStrip() {
  for( int i = 0; i<NUM_PIXELS; i++){
    strip.setPixelColor(i, 0x000000); strip.show();
  }
}

uint32_t dimColor(uint32_t color, uint8_t width) {
   return (((color&0xFF0000)/width)&0xFF0000) + (((color&0x00FF00)/width)&0x00FF00) + (((color&0x0000FF)/width)&0x0000FF);
}
LCD (I2C)#
- need a level shifter
stepper motor (WIP)#
examples - MattairTech MT-D21E (WIP)#
files#
- Eagle files
- Crystal/FC-135 version: sch, brd, and lbr
- Crystal/FC-255 version: sch, brd, and lbr
- trace image (1600 dpi. Because of mac-mods problem, enter 3200 dpi in mods settings)
references#
- Minimal ATSAMD21 Computer - Technoblogy
- Arduino Zero - Arduino.cc
-
Programming Microcontrollers using OpenOCD on a Raspberry Pi
-
Using ATSAMD21 SERCOM for more SPI, I2C and Serial ports - Adafruit
-
Serial Communications - Arduino Cookbook, 3rd Edition by Michael Margolis, Brian Jepson, Nicholas Robert Weldin(O’REILLY)
-
Samd- Arduino Library List